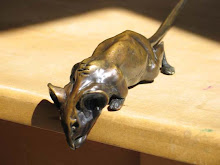
Drilling holes in the granite bases and screwing in the semi submerged turtles for Bumper to Bumper was giving me some major headaches.
Some turtles were drilled and tapped with a smaller size hole for 10/24 screws, while the others were larger for quarter twenty screws. I got different turtles cast and metal worked at different times, which explains that.
Keeping organized was a lifesaver, with each base numbered, and each turtle marked on its underside according to which base it went on and it's position in the lineup.
Getting the hole locations marked was easy enough. After smearing some release agent with a Q-tip around each hole on the undersides of the turtles (thanks for that, Lee) I pushed a flattened pea sized ball of soft waxy clay over the hole, positioned all the turtles on the base and then removed them.
Voila!
Six little flattened bits of clay with short stalks corresponding to the holes under the turtles were stuck nicely to the granite.
Then I just lowered the right sized diamond core drill bit into place, clamped the granite, surrounded the area with a dam of clay, filled the dam with water, removed the tiny blob of clay I was aiming the drill at, and slowly and carefully drilled through the rock on the slowest speed my drill would go.
I've mentioned before how much I love that rubbery stuff on rolls you can buy for your cutlery drawer from the supermarket.
I find it great anytime I need some grippy friction and cushioning, so it was great under the granite to help hold it steady.
I took my time and lifted up the drill several times so as not to overheat the granite since that might cause it to crack.
When the drill went right through the water drained out into a bowl underneath and I repeated the process until done.
 |
| I used a chinagraph pencil to remind me which were the quarter twenty holes on the granite (so I didn't drill the 10/24 ones with the same bit) |
My legal disclaimer goes here...water and electrical appliances don't mix. So of course I'm not suggesting you do what I did, I'm just saying it's what I did. Check with the manufacturer of your drill press to find out what you should do, and of course wear safety goggles.
And a snorkel too, if you like.Oh, and super hot bits of rock could shatter and fly off and do you or others all kinds of damage.
So wear all the appropriate safety gear and keep kids/pets etc away.
So, to continue my legal disclaimer, don't drill anything without using a proper air filter on your face or the dust might kill you. Only work in well ventilated areas. And get the proper supervision.
And don't get water on electrical equipment. That's just asking for trouble.
So the procedures I've taken and am describing here are not meant as advice. They are for your entertainment so you can marvel at how I have somehow survived such reckless behavior. (so far, anyway). So view this not as a 'how to' post, but as a 'how NOT to' post.
So later I used a nylon washer with each screw. The washer is essential otherwise the screw gets jammed in the hole, while the nylon washer can become crushed into the hole and provide some compression for the ever tightening screw.
That worked wonders for the smaller 10/24 screws, but the larger quarter twenties didn't have the wiggle room and got jammed up inside the narrow 1/2" wide steep sided hole.
A 5/8 or 3/4 masonry bit turned out to be the answer to that problem.
 |
| Masonry bit |
Depending on how deep you make the countersink, and how many nylon washers you use, and how long your screw is, and how thick your granite is, you can get it to work out every time.
Before I got the masonry bit to use as a countersink I spent a whole evening messing about trying (unsuccessfully) just to get a couple or three turtles screwed into place that were needing quarter twenty screws. It was a frustrating nightmare.
But when I got better tools to do the job, it was a breeze in comparison.
For quarter twenty screws I'll use a 5/16" diamond core bit, and a 5/8" masonry bit for the countersink, with 1/2" screws and one or two nylon washers in each for granite 3/8" thick.
For 10/24 screws I used 1/4" diamond core bit, and the 1/2" glass and tile bit that looks like a spear.
I'm sure a 1/2" masonry bit would work great for that too.
After some clean up, felt dots go on the bottom of the granite to keep it from scratching the furniture, unless you're really determined of course.
Where there's a will there's a way.
Oh, I almost forgot, Merry Christmas!
Click these links to visit my website... SteveWorthingtonArt.com - Sculpture that loves you back
or my Etsy store, CritterVille
or my Etsy store, CritterVille


1 comment:
Can't believe that such an idea will also help in solving granite drilling and bronze mounting problems..
Post a Comment