Showing posts with label bronze. Show all posts

Saturday, October 27, 2018

New bronze mouse up for grabs on Kickstarter. Meet Neo Chubby Mouse!

Here's a link to the project (running for 1 month, so you can get in early at 20 percent less than retail).

Here's Neo Chubby!!
Neo Chubby Mouse - Solid bronze, in an elegant art deco style by Steve Worthington


Saturday, July 19, 2014

Soon I will be saying 'goodbye'...

Steve Worthington with bronze painted turtle (pre-patina)
 Above is my turtle before patina, and below is Mike Masse (master patineur) having completed his handiwork. I asked for a traditional bronze patina that would weather well.

Mike Masse with Steve Worthington's bronze painted turtle (post patina)
 Below are a few smaller ones as well!
A selection of variously sized bronze turtles (and one silver turtle)
Soon it will be off to Canada to stand guard over a lake in a park. And I only just got it house trained!

Click these links to visit my website...SteveWorthingtonArt.com - Sculpture that loves you back
or my Etsy store, CritterVille

Friday, February 26, 2010

My bronze mice can scare the crap out of toilets!

The HORROR......
A picture is worth a thousand words, so here's a two thousand word post!


For a better look at these scary beasts
click these links to visit my website... SteveWorthingtonArt.com - Sculpture that loves you back

or my Etsy store, CritterVille

Friday, December 18, 2009

New sculpture in the making: tree frogs on a vine


One tree frog has landed on the vine.
Soon there will be two more joining it.

I already know how and where the other two will land.
Can you guess?


My website... SteveWorthingtonArt.com - Sculpture that loves you back
My Etsy store, CritterVille.

Wednesday, December 2, 2009

How to sculpt critters, make bronze animals etc. 24 of my 'how to' sculpture posts: Now easy to find, all in one place.


I was trying out the search feature the other day, to find an old 'How to' post.
Seems I hardly ever used those exact words, and I know I've posted quite a few of them, so I put them all in one place, in chronological order with the oldest first.

How to make mice, monkeys, elephants, frogs, turtles, bases, and all sorts of other work in progress for anyone interested in having a go, or simply curious about what goes into this sculpting and casting caper...

Beijing Olympic mascot (unofficial) - This post shows a turnaround of my monkey turtle discus thrower as it progressed.

Making of 'Big Boy', my large Cane Toad sculpture - Two of these live on a bridge over a pond in a park in Loveland, Colorado.

Bumper to Bumper. Turtle sculpture work in progress - 1

The birth of Nosey mouse.

More mousey 'how it's done'.

Bumper to bumper turtle sculpture, work in progress - 2

Making 'Tiny mouse'.

Death of an elephant. This is just some pics of a sculpture being 're-claimed' for future sculptures.

Even more Nosey 'how it's done'.

Bumper to bumper turtle sculpture - work in progress - 3

Bumper to bumper turtle sculpture - work in progress - 4

Step by step how to make a tiny elephant sculpture.

Next steps in bringing my tiny elephant sculpture to bronze.

How to make small sculpture bases by cutting up and edge polishing black granite tiles.

Putting it all together (making micro sized bumper to bumper turtle sculpture).
Hoodrats and the black hole of doom!....making the hood ornament version of Sprightly for my car.

Hoodrats, Darth Vader, and the tree snake of death!

Sprightly mouse hood ornament-The hoodrat rides!

Final bronze elephant and more garden snake action!

My new butterfly salad toad sculpture is finished.

My secret weapon and favorite tool for creating sculpture...(worth a look just to see my secret weapon)

Race against the clock- getting new stuff cast in time for my first gallery show...

New shiny toy and new work in progress report.

How a hole in the head sometimes helps, and how to avoid one when it doesn't.

The tree frog has landed.

Well I hope you enjoyed that, there's lots of other stuff buried in the archives too of course!

My website... SteveWorthingtonArt.com - Sculpture that loves you back
My Etsy store, CritterVille.

Sunday, October 18, 2009

The tree frog has landed...


One small step for a tree frog,
One giant leap for tree frog-kind.
(I've not actually had any real tree frogs confirm that last part)

Anyhow, I've got my first two tree frog sculptures finished.
Over at Mike's secret patina cave we tried a few things. Like some greens in various hues, but ended up liking a transparent golden-ish bronze with dark blotchy rings best.


The blotchiness is very similar to the markings on my real tree frog as he might be seen in a gigantic version sitting on the earth and viewed from space.

Unfortunately a tree frog's place on our planet is a bit precarious these days.

So now I know I'll have tree frogs in my show at Manitou Galleries on Nov 6, thanks to Madd Castings turning the raw metal around so fast, Lee's speedy mold making and wax work, and Mike's splendid metal finishing and artful patina work.

I'm sure I must have had something to do with making them too, but it seems so long ago I can hardly remember!

I took a few pics of one over at Meridee's favorite garden center.


I've got more frogs up my sleeve I'm itching to get going on, but first things first.
Will I get my new turtle pieces finished in time for the show?

Oh, speaking of shows, I'm honored to have some mice and tiny bunnies in Albuquerque museum's miniatures and more show which kicks off next Saturday (Oct 24).
Not sure if Saturday is open to the public or pre-arranged somehow.

My website, SteveWorthingtonArt.com - Sculpture that loves you back
My Etsy store, CritterVille.

Monday, October 5, 2009

How a hole in the head sometimes helps, and how to avoid one when it doesn't...

I picked up a bunch of my castings from the foundry folks on Saturday to hand over to Lee when he gets back from his marathon mold making session in Colorado.

They raved enthusiastically about Lee's mold making, by the way.

But back to casting issues. When you cast pieces hollow you can run into a bit of a problem, depending on the shape.

This might get a bit confusing to follow! My attempts at describing it are far from perfect!

Once you have your thin wax (like half of one of those hollow easter eggs), you have to coat both the inside and outside in hard ceramic shell. To do this you dip it into a slurry, let it dry, and repeat several times, over several days.
Trouble is, if you imagine filling a cup made of chocolate by gripping the rim and dipping it into batter bottom first, it fills up and is so heavy to lift out that things can break.
Or at best, the slurry is so far down inside a long skinny cup that no air gets to it to dry it out.
It would be easier if the cup had a hole in the bottom. Which is usually about where anything's head would be.
With a hole in the bottom, our cup would fill up from the bottom (coating the inside and outside simultaneously) and drain when you pull it back out.

So as you can see with the toad, you remove a 'window' to let the slurry run out, so it can thinly coat both the inside and the outside of the wax (which of course later is melted out and bronze poured into the empty void).

Then the window piece (like a piece removed from the bottom of a cup) is cast separately and welded back in and the join cleaned up later.
Well with my turtle and tree frogs I didn't want any windows cut out and welded back in, but they were still going to be cast hollow.

So instead, once you have your hollow wax sculpture, you push some bronze pins through it.
You dip the wax into the slurry (like pushing a cup bottom first into some batter), but don't let it spill over the edge to the inside.
The inside is dealt with separately.

It is completely filled with a plaster type material that dries more easily. The plaster stuff is held in place by the pins (which are also held by the ceramic shell on the outside), so when the wax is melted out the inner lump of plaster doesn't fall to one side or the other (if it did, you'd have a thick bronze on one side, and holes in the other).

Then, when the plaster is set, the wax is melted out and the bronze is poured into the space that the wax left behind, the resulting bronze critter, once the ceramic shell on the outside, and the plastery stuff on the inside is removed, appears to have pins pushed into it (and you can see them inside too).

But no holes in their heads to mess about with later.
Just a couple of pins to grind off and smooth over.

Interestingly I was introduced to the 'hole in the head' in shot form during my years in Hong Kong.
Martyn, who was tending bars at the time (just about everyone did a stint behind the bar at one point or other) showed me a layered drink in a shot glass. It was three layers, one of Sambuka and one of Vodka, with a lethal red line of tabasco in between.

Downed in one and called a 'hole in the head', it was designed to make your eyes water!

My website, my Etsy store.

Monday, August 3, 2009

Sprightly down under 2

Here's some pics of Sprightly's most recent trip down under...
Click HERE for last year's antipodean adventure where Sprightly comes face to face with the Sydney opera house.No trip down under is complete without a visit to the house with the best satellite TV reception in the world...


My website here, my Etsy store here.

Sunday, June 14, 2009

Tiny turtle dilemma – the problems involved when producing miniature bronze turtle sculptures


There’s a great Seinfeld 2 part story called ‘the bottle deposit’ where Kramer and Newman are racking their brains to figure something out: Newman wants to take empty beer bottles to Michigan and deposit them for the extra five cents you get in that state.

Kramer tells him it’s impossible.
If they drive them there, the gas, toll booth and truck rental prices will kill them.
Newman’s determined to crunch the numbers every possible way to make it add up.

I have a similar dilemma with my tiny turtles.
Plenty of people have told me it’s not worth the hassle making tiny pieces. The work involved means you have to charge a lot, or you just don’t make any money on them.
Things with my tiny turtles seemed to be going well. But my supplier got fed up fiddling with them since his casting results were inconsistent. Sometimes they’d come out just fine, so he could give them to me after minimal metal finishing. If that happened every time things would still be great.

But the metal finishing is where he loses money since he gave me a per piece fixed price based on the assumption of consistently good casting results. But sometimes there’d be problems that would need extra time to fix (time is money), or he’d just ditch the problem ones and cast more. Again, wasted time and effort on his part. His prices were great for me, which is what I based my retail price on. But he’s had enough of making them.

So now I’m getting them made somewhere else, but it’s costing me more. They’re casting great, but the sprues the foundry puts on the bottom are bigger than my previous supplier’s, and they obliterate more of the under surface, including my initials.
So they need more work done after casting (after cutting off the bigger sprue, the bottom of the turtle needs to be metal worked, essentially re-sculpting that portion where the sprue was attached on each one), and that extra time adds to the bill.
I don’t want to raise the price on them, they’re 2 of my most affordable pieces.
I like that just about anyone who wants one can get one.


Here’s my options. Do I :-

Stop making them, it’s just too much trouble.
Drop the quality (just flatten off the bottom rather than have metal workers re-sculpt it) so I can still make a bit of money on them (they’d look fine except from underneath)?
Maintain the original quality but raise the price so I can still make a bit of money on them?
Maintain quality but keep the original price so I make next to nothing but you can still have one to enjoy at the same price as before, while I continue to explore other options?

I have decided to go with the last option:
Keep the same price, while trying to figure out a way to make it work.
At least for now.

Like Newman I’m hoping to find a successful ‘other option’ before too long and prove the nay sayers wrong!

They are available from me directly, from my Etsy store, and from some of the galleries I show in.

Saturday, May 30, 2009

Final bronze elephant and more garden snake action!

Well I've been tooling around town in the hoodrat mobile lately to some satisfyingly bemused expressions.
And I've got the teeny tiny version of 'Senior moment' all finished up.
I posted a previous blog on making the original clay HERE, followed that up with mold making and shooting waxes HERE, and here's the finished piece (which you can see more views of on my Etsy store and website).

But the really exciting news is another snake sighting in the back yard!
This time it wasn't the usual bull snake, it was a COACHWHIP snake.

Meridee called me outside saying my snake was hanging out in some old budlia branches, but when I saw him I recognized he wasn't old faithful.
I've bumped into a few of these before. They often look quite pink. They like to lunch on lizards.

And the one's I've seen can shift like nothing else. One time I was sure I must have run one over that decided to make a mad dash across the road.
It was moving like someone had it on a long string tied to a sprinting greyhound, but a peek in the rear view mirror showed no road kill I'm glad to say.

So I was pretty careful not to get too close at first or else I would have spooked it into speeding off and missed my photo op. I edged closer very slowly...
Look at those beady eyes!
Curiously, a neighbor gravely told me, shortly after we moved in, that coachwhip snakes gang together in long grass and stand on their heads and will whip at your legs with their tails leaving quite serious wounds.

Fortunately I managed to express surprise without delivering any serious wounds to myself through suppressed laughter. I reckon that little gem got into circulation around the era of the 'Little house on the prairie' when some big scaredy cat maybe ran away from a garter snake or something, through some bushes and had to explain his scratches and actions to an inquisitive audience of his peers.

Or if not his peers, perhaps some very young children, who are prone to believe whatever a grown up tells them. I imagine he stumbled scratched, panting and bleeding out into a clearing of tiny yet studiously attentive Sunday school students.

But I digress. My photo op finally made a break for it, and covered a couple of dozen feet in what seemed like less than a second to hide behind a bush.I checked it out from one side of the bush, then the other side, then back again and it wasn't there!
I hunted around, but I couldn't find it anywhere.
Take your eyes off for a second and whoosh.
Gone.
Oh well.
I wonder what will show up next.

Saturday, May 23, 2009

What's fine about fine art?

There's a gallery in town with bronze dogs by two different artists.
The gallery director (not the owner) told me one wouldn't rate as 'fine art' with her since they're just dogs being dogs, whereas the other she would describe as 'fine art' because it's not just being a dog, it's more arty and it has an idea.
I said for my money the dogs being dogs had character, personality and were more finely sculpted with a great deal of style. While the arty one seemed quirky more than fine. Maybe the fineness of the idea eluded me.I said, since I thought they were very finely made, I'd call the regular dogs 'fine art', and the other one 'quirky art'.She mentioned that the quirky/arty one she had been championing had been her choice to bring in to the gallery, so that may have explained her harder sell!

On a different note, my hoodrat is now finished and installed, and as soon as I get a nice sunny day to get some pics of him showing off around town I'll post a few!

Friday, April 24, 2009

Putting it all together (making micro size bumper to bumper turtle sculpture)


In our last exciting episode we watched from the edge of our seats while our intrepid hero risked life and limb to fearlessly cut up pieces of granite tile and polish the edges.
All without the use of a safety net.
This time those tiles get pressed into service as small sculpture bases.
I used a DREMEL engraver (it vibrates a pointy end to break up surfaces and engrave things).
Some JB Weld, which is a top notch epoxy resin recommended by my main man at Advanced Casting, Frank. He casts my tiny turtle parts. A white chinagraph pencil, and some paperclips and other stuff to mix up the epoxy round out the list of stuff I'll need.
I mark the turtle positions (inside the boundary of each piece) with the chinagraph pencil onto the granite surface.
I use the extremely ominous looking DREMEL engraver to hammer on the granite to roughen it up. This provides a 'tooth' for the epoxy to adhere to. Of course I use all the relevant safety gear (see DREMEL instructions for more info). You don't want granite dust so fine it looks like smoke drifting into places on your (or anyone else's) person it doesn't belong.
That is one noisy tool for something so small! It sounds like a road crew with pneumatic drills has broken in and is trying to smash up your kitchen sink.
I rough up the bottoms of the turtle parts then mix up the epoxy and stick 'em on the granite.
I like to wait overnight for the epoxy to fully cure. Of course I allow my attention to wander a bit during this phase: perhaps towards the tv for instance.

The next day, self adhesive felt dots and a signature are added...
Viola! A micro sized version of 'bumper to bumper'.
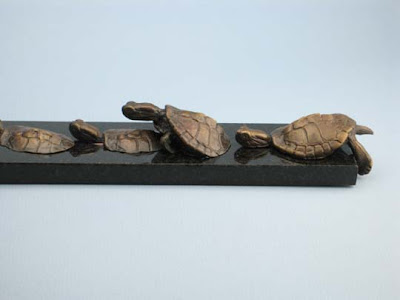
Ready for its close up.


Here's my elaborate photographic set up. A bit of blue gray paper propped up, some Lowel Ego lights, a reflector, and a bean bag for the camera to rest on. I learned a lot from Gary Regester's site on lighting with Lowel Ego's. You'll get better photo tips from him than me!

I tweeked the contrast a bit in photoshop to blow out the background more towards white, and I also set the camera to over expose one stop when I took the pics.
The rest of my bronzes are all here on my website.