In our last exciting episode we watched from the edge of our seats while our intrepid hero risked life and limb to fearlessly cut up pieces of granite tile and polish the edges.
All without the use of a safety net.
This time those tiles get pressed into service as small sculpture bases.
I used a DREMEL engraver (it vibrates a pointy end to break up surfaces and engrave things).
Some JB Weld, which is a top notch epoxy resin recommended by my main man at Advanced Casting, Frank. He casts my tiny turtle parts. A white chinagraph pencil, and some paperclips and other stuff to mix up the epoxy round out the list of stuff I'll need.
 I mark the turtle positions (inside the boundary of each piece) with the chinagraph pencil onto the granite surface.
 I use the extremely ominous looking DREMEL engraver to hammer on the granite to roughen it up. This provides a 'tooth' for the epoxy to adhere to. Of course I use all the relevant safety gear (see DREMEL instructions for more info). You don't want granite dust so fine it looks like smoke drifting into places on your (or anyone else's) person it doesn't belong.
 That is one noisy tool for something so small! It sounds like a road crew with pneumatic drills has broken in and is trying to smash up your kitchen sink.
I rough up the bottoms of the turtle parts then mix up the epoxy and stick 'em on the granite.
I like to wait overnight for the epoxy to fully cure. Of course I allow my attention to wander a bit during this phase: perhaps towards the tv for instance.

 The next day, self adhesive felt dots and a signature are added...
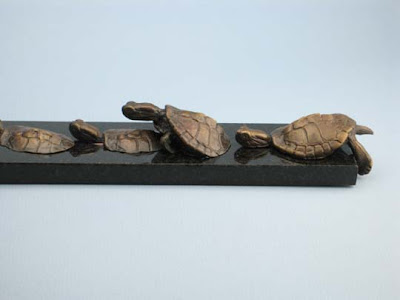
 Viola! A micro sized version of 'bumper to bumper'.
Ready for its close up.


 Here's my elaborate photographic set up. A bit of blue gray paper propped up, some Lowel Ego lights, a reflector, and a bean bag for the camera to rest on. I learned a lot from Gary Regester's site on lighting with Lowel Ego's. You'll get better photo tips from him than me!
 I tweeked the contrast a bit in photoshop to blow out the background more towards white, and I also set the camera to over expose one stop when I took the pics.
The rest of my bronzes are all here on my website.


2 comments:
Hi Steve,
This sculpture is really well thought and executed.
Although I just skimmed through your blog (I'm in a hurry), it seems that I'll have to pay another visit.
One of these days you'll have to conceed me an interview for mine.
Best regards,
José
I use the extremely ominous looking DREMEL engraver to hammer on the granite to roughen it up. This provides a 'tooth' for the epoxy to ... dremelmicro.blogspot.com
Post a Comment