Showing posts with label senior moment. Show all posts

Thursday, July 5, 2012

Senior Moment. A bit of video of Rodin's 'Thinker' in elephant form...

This year's Western Visions show will include my 'Senior Moment' elephant in Rodin's 'Thinker' pose.

I made a quick video of it.

Any guesses what I used for the audio?


Click these links to visit my website... SteveWorthingtonArt.com - Sculpture that loves you back
or my Etsy store, CritterVille

Friday, February 12, 2010

How this way of enlarging your work by yourself could save you time, money and headaches!


I've re-made a few of my pieces in different sizes.
I didn't know how to do it, so I just muddled through with a calculator and a photocopier and lots of scraps of paper.

If I'd known about this other way of doing it I'd have saved myself a bunch of time and headaches.

I wish I'd known about this right from the get-go!

It's based on the notion that the ratio of enlargement of the overall height from your model to the intended enlargement, is the same for all the other measurements you can make.
Same for an arm, a head, a nose (even a very long nose), whatever.

Like most things useful I find out about, it's as old as the hills and I reckon I must be about the last person on earth to hear about it. I found this method in a book 'The Sculptor's Way' by Brenda Putnam, published by Dover.

Just in case I'm not the absolute last person to hear about it, here goes…

The long line at the bottom (AB) is as long as the height of the intended enlargement.
With some calipers, measure the height of your small piece. Put one end of the calipers at the far end of the long line (B), and make an arc.
The radius of the arc is the height of your small piece.
From the near end of the long line (A), make a longer diagonal line that just touches the arc.
This line is what you use to figure out your proportions.

Say you want to find out how long to make the leg of your enlargement.
Measure the small model's leg with calipers, and make an arc the same way you did at the end of the long line, but this time it will be closer to the near end, somewhere between A and B. So you slide one end of the calipers along the base line until you can make an arc that just touches the diagonal line.
The caliper will only be able to do this at one point on the base line, C.

The distance from point A to your caliper point on the base line 'C' is the length of the leg of the enlargement (AC).
And so on with all your other measurements.
I suppose you could even use string to measure circumferences (lay the string out and use it like it was any other measurement).
If you did that you might have to extend the lines beyond your original arc, if you're making something very fat.

Pretty neat huh?
All you need to do is make the original triangle type lines on a big bit of cardboard or something, and you're all set.
You need calipers that are small enough to measure off your small model and others big enough to use for your large one, but getting them is well worth it for the grief you'll be saved!

And even better, you can reverse the equation to reduce pieces.
The radius of the first arc is how big you want the piece reduced to, the base line is how big your original piece is.

Of course you still have to do all the actual work!
If money is no object but you're short on time, do what a lot of people do and get a digital enlargement in foam to serve as an armature and finish it off with clay!
I have never tried this, but if I had to make an enlargement that was really huge, say a life sized elephant for example, I think I'd go that route.
This is the largest of my Senior Moments at about 20" tall (I made four different sizes).

Saturday, May 30, 2009

Final bronze elephant and more garden snake action!

Well I've been tooling around town in the hoodrat mobile lately to some satisfyingly bemused expressions.
And I've got the teeny tiny version of 'Senior moment' all finished up.
I posted a previous blog on making the original clay HERE, followed that up with mold making and shooting waxes HERE, and here's the finished piece (which you can see more views of on my Etsy store and website).

But the really exciting news is another snake sighting in the back yard!
This time it wasn't the usual bull snake, it was a COACHWHIP snake.

Meridee called me outside saying my snake was hanging out in some old budlia branches, but when I saw him I recognized he wasn't old faithful.
I've bumped into a few of these before. They often look quite pink. They like to lunch on lizards.

And the one's I've seen can shift like nothing else. One time I was sure I must have run one over that decided to make a mad dash across the road.
It was moving like someone had it on a long string tied to a sprinting greyhound, but a peek in the rear view mirror showed no road kill I'm glad to say.

So I was pretty careful not to get too close at first or else I would have spooked it into speeding off and missed my photo op. I edged closer very slowly...
Look at those beady eyes!
Curiously, a neighbor gravely told me, shortly after we moved in, that coachwhip snakes gang together in long grass and stand on their heads and will whip at your legs with their tails leaving quite serious wounds.

Fortunately I managed to express surprise without delivering any serious wounds to myself through suppressed laughter. I reckon that little gem got into circulation around the era of the 'Little house on the prairie' when some big scaredy cat maybe ran away from a garter snake or something, through some bushes and had to explain his scratches and actions to an inquisitive audience of his peers.

Or if not his peers, perhaps some very young children, who are prone to believe whatever a grown up tells them. I imagine he stumbled scratched, panting and bleeding out into a clearing of tiny yet studiously attentive Sunday school students.

But I digress. My photo op finally made a break for it, and covered a couple of dozen feet in what seemed like less than a second to hide behind a bush.I checked it out from one side of the bush, then the other side, then back again and it wasn't there!
I hunted around, but I couldn't find it anywhere.
Take your eyes off for a second and whoosh.
Gone.
Oh well.
I wonder what will show up next.

Saturday, March 28, 2009

Next steps in bringing my tiny elephant sculpture to bronze...


Here we are again, with my teeny tiny version of 'Senior moment'.
In the last installment I demonstrated how I made the original in a wax based clay.
So how do we turn one finished sculpture into a bunch of wax replicas ready for the foundry to then turn them into bronze?
My buddy Lee Wilson got busy making a mold. He's molded everything from the almost microscopic to bigger than a horse (see behind?). Nothing fazes Lee!
Here he is holding a work in progress on my miniature elephant...
The silicone rubber master mold is floppy (that's the yellow stuff), and needs a hard mother mold which can be screwed tightly around it to hold it in place (that's the white stuff).
I wonder is mold language developed similar to tool language, what with their male and female parts and all?With all the silicone rubber 'chew toys' laying about I was surprised and a bit nervous to discover from experience that mold makers seem to like to have a dog or two about the place. Must be the loneliness of the job.
Anyhow, Lee's are extremely well trained and only once got interested in sniffing the rubber when he was molding some cow bones for someone!
One rebuke put an end to that and they have NEVER messed with his handiwork, so I'm confident leaving my molds over at his place for extended periods.
So here he is tightening the bolts to keep the whole thing snugly together (you'll see why next)...
This is Lee's new toy! It's a wax injector. So for smaller stuff he can squirt wax into the mold under pressure (which will squirt out all over the place if the mold isn't securely held tight). It's quicker and more effective than painting the wax into the mold by hand on small things like this.

He experimented a bit to get the wax temperature and pressure optimal for various sized pieces. He mixed some pigment in with a blue green wax to make it a nice natural clay color. That way it's easier to see if any seam lines need cleaning up than if the wax is a day-glo color (plenty of waxes are very strange colors). You can see a few of my turtles, toads and rabbits floating about on the table too.
That metal plate with a hole in it is what he holds over the bottom of the mold when he squirts the wax in. Then it's left to cool for 20 or 30 minutes.
If the mold only has a narrow opening, he'll just use a washer.
Alright, let's pop that thing open and see what we've got!
Off comes the mother mold...
Wait for it...
Ta-daaaa!!!!
And Lee has given birth to yet another teeny tiny wax elephant. Didn't hurt did it?
Family photo below.
Strange gene pool I'd say.If I can get the foundry to take some pics of sprueing up the waxes, investing and breaking them open I'll add them to a future post, then finish up with metal chasing (should hardly be any except grinding the bottoms), and patina which I will do myself.

My website here

Tuesday, March 3, 2009

Step by step how to make a tiny elephant sculpture


OK, so I'm making a very tiny version of my 'Senior Moment' sculpture. An elephant in Rodin's famous 'Thinker' pose. Above you can see the tools I used. Some wooden shaped things and some metal pointy things with little round blobs on the end, which I believe are called 'fillet' or 'fill-it' tools. Can't say for sure, but I think that's what they're called!
And of course my favorite tools, which I use the most, my fingers.
The first thing I did was reduce all the measurements I have in proportion to the size elephant I'm making. I'd taken proportional measurements from pics of elephants, anatomy books, pics of skeletons and what not, so each time I start him in a new size, I have measurements to rely on since I don't trust myself one bit to eyeball it as I go.
So above we see, from left to right, a base for him to sit on, his rib cage, pelvis, and skull.
This is the 4th time I've made him. Like a line of Mercedes cars to fit any budget!
So far the biggest is some 20 odd inches tall, and this guy is the smallest at 2.75" tall!
Here they are all together (above). Looks like a weird fish leaping out of the water, eh?
Now you can see why I don't trust myself to eyeball proportions. Everything looks so weird at this stage I'd be second guessing myself like crazy if I didn't know it would all end up looking right later.
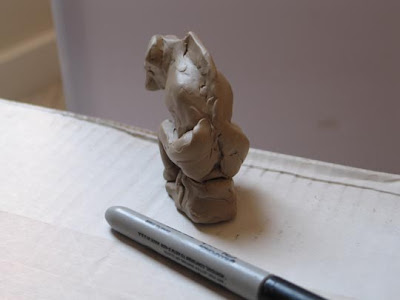
Some muscles are added, so it's really handy to have anatomical reference standing by.
The head's bizzare looking, all duck billed and strange since it's just a skull, and elephants have the strangest looking skulls of just about anything.
Oh, I did take some liberties with the length of the thighs to get the pose to work. That's the case in all four different size versions.
I add the clay in small blobs. I find it's easier to add anatomically and keep the life in it, than scrape away excess and hope it doesn't lose its suppleness. That's just me of course, some people work subtractively from rock for instance. Mmmm, let's see, oh yes. Michelangelo springs to mind.
He was pretty handy with a subtractive approach, I'm sure you will agree!
Notice the ear above is made up of blobs of clay depending on where the form goes. I didn't make a flat bit of clay and stick it on. There's some folds appearing around his legs and mouth as well as muscle and fat taking shape.
This is the only size of this piece that didn't need any armature support at all, since the clay is very light and sticky, and he's so small.
The clay I use is jmac wax based plastilene, the softest one they do. It can get a bit messy if you aren't careful. When using tools, I go with the same approach I learned when painting. Get the biggest one you can that will do the job, that way I don't end up with over fussy patting effects, just nice clean broad strokes. That's the most important thing to maintain. Adding details is easy later, but taking an over fussily detailed sculpture back to something more elegantly simple is much more difficult. Not least because you don't want to scrape back all that hard work you put in!
I might fiddle around with him a bit more, but for now he's pretty much done.
One thing I've learned making small stuff which is cast solid (not hollow like bigger stuff) using a more brittle plaster investment than ceramic shell is to make sure not to have any deep recesses with sharp bottoms. You have to smooth them out with the round blob on a stick tool. Otherwise, bits of investment fall off and float around in the bronze during casting, only to surface as pits all over the place. A tiny amount is tolerable, but if you have lots of grooves cut into your original piece, say with a knife or other sharp tool, it's bad news later.

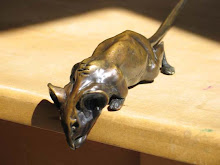
The pic below was sent to my man at the foundry to show him where the tunnels are and see if it will give him any problems with mold making and casting. The mouse is for scale (he knows how big it is) since if you cast solid bronze beyond a certain size, you run into all kinds of shrinkage problems.
Especially if it has skinny protruberances, since ideally the metal is runnier and hotter for skinny things (or it won't make it to the ends), but cooler and thicker for larger bodied things (or it will shrink away from the mold as it cools). Both in one go can be problematic since you can only pour the metal at one temperature for the whole piece.
If elephants are scared of mice this guy must be terrified!
Keep your eyes peeled for the finished bronze (I'd say give it a month or two)!
I'm pretty excited to see it all done!

Thursday, July 31, 2008

'Senior Moment' elephant sculpture is back from the foundry...


I'm excited to see that my elephant patina is looking good after a close scrutiny up close and personal.
I've taken some pics on my Canon powershot which is good enough for web purposes but not high enough resolution for any decent size printed output.
Also, my lights are pretty small. It's getting to be a stretch for them doing sculpture this size (20" tall)
So it's getting photographed elsewhere with a higher res camera and better lights.
Mind you, I like the way he's looking in my pics.
Nice job Bronze Smith.
More goodies on my website...

Friday, July 4, 2008

Death of an elephant...


In our ecologically minded world being a cheapskate can be a virtue.
Once molded the clay can be thrown away, or re-used to make something else.
Maybe some of the molecules in my body used to be some part of an elephant at one point in time.
I re-used my rabbits to make a giant toad, and I'm re-using my elephant to make some more giant toads.
Here's my clay elephant back from the foundry ready for some impending unpleasantness.
The slippery surface must be scraped back since it's all covered in a release agent to facilitate easy mold rubber release. Can't save that stuff, so it goes in the trash.
A wire clay tool, a knife, and most dangerous of all, a cheese scraper, are all you need to get the job done.
The cheese scraper is dangerous only if your co-habitants spot you using it, when it might be all you have to defend yourself with against much more intimidating weapons. It's not very effective as an offensive weapon, or as a shield. Not so slippery now, the serious business of re-clay-mation can begin.
The box is starting to fill up nicely.

Ahh, if only shedding pounds was that easy.
A remnant of his former self ends up in the trash, (foam and pipes and wire covered in clay), while the rest gets to live another day.
Might have to get a bigger box.
He died that others might live.
Very 'circle of life', eh?
It's not all bad news for the elephant, he gets to enjoy eternal life as a bronze. Which should give him plenty of time to figure out whatever it is that's on his mind.
More stuff on my website.