Showing posts with label Bob Barker. Show all posts

Sunday, December 4, 2011

Calves, a masked man in the snow, and a dud casting...

Here's a few random pics for your viewing pleasure!

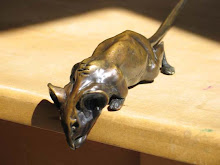
Freshly cast plaques (need finishing and patina), a dud attempt at casting metal masters of my new angel mice, and an American Indian snow suited superhero keeping watch on Canyon Road (not mine, I just had to take the pic when I saw him!)

 This plaque is my modified award one I did for Mercy For Animals to present to Bob Barker minus the lettering, plus some additional background sky. Needs sandblasting and patina...


The first attempt at casting the angel mice came out a bust (shrinkage, and bits didn't cast properly etc), but not to worry, it took six tries to get my metal masters done for Pugnacious and Rumpy and Pumpy mice.
We'll get there...

What's Angel Chubby whispering?
And when I saw this guy standing stoically up Canyon Road I had to get his picture!
The snow made it sort of a bit of a mash up of a day of the dead superhero American Indian character!
.


Click these links to visit my website... SteveWorthingtonArt.com - Sculpture that loves you back
or my Etsy store, CritterVille
.

Saturday, June 11, 2011

Guess who forked out $250,000 after getting one of my bronzes...?!


That's right, Bob Barker!
Mercy For Animals awarded Bob Barker their 'Compassionate Leadership Award', which (I'm both proud and honored to say) took the form of my framed bronze plaque.

Then Bob handed them a check for $250,000!

Click HERE to learn more about Bob's donation at the Mercy For Animals event.

Of course while it would nice to think he felt moved to such generosity by my touching handiwork, in reality he's a diehard defender of animal rights with a formidable track record of donating millions to causes that support those goals.

When I told Lee (who made the mold and pulled the wax), he said I should have personally called Bob earlier and offered him a 20 percent discount!
.


Click these links to visit my website... SteveWorthingtonArt.com - Sculpture that loves you back
or my Etsy store, CritterVille
.

Saturday, April 30, 2011

How to make a bronze bas relief award plaque honoring Bob Barker...Part 3

My plaque came back from the foundry.
Lee chopped off the sprues, welded a hanger on the back (just in case it's ever taken from its frame), and gave it a once over in the sandblast cabinet.

sandblasted bronze, ready for patina


After that, it's time for me to create the patina (being sure to take all the necessary safety precautions, of course).
I gave it a soak in sulphurated potash (just a sprinkle, mixed in water) to turn it black.
Then I scrubbed it back with a scotch brite pad, and then some very fine steel wool.


After that, I heated it with a weed burning torch and sprayed on a mix of ferric nitrate and cupric nitrate, then waxed it while hot.


A quick buffing after it cooled was all that was needed before popping it into a its frame.


Next stop: Mercy For Animals.
Final destination: Bob Barker!

I've cast only two of this version (one to be given to Bob, and one for me to keep), but when I get a bunch of my non-award version cast (which has a cloudy sky instead of award lettering and will be sent to galleries) I'll post pics of that too.

This has been both an honor and a great deal of fun to make.
Thanks Mercy For Animals!

And thanks Lee for helping me get it done in time!


.

Click these links to visit my website... SteveWorthingtonArt.com - Sculpture that loves you back
or my Etsy store, CritterVille
.

Friday, April 8, 2011

How to make a bronze bas relief award plaque honoring Bob Barker...Part 2

finished plaque (added after this post was first published)

I had planned to have Lee Wilson mold my calf, pull waxes, and then I'd letter each one directly onto the wax.
Luckily I like to run my plans past Lee when they involve production steps since he's very efficient and always thinking the next step (or three) ahead to streamline the process from mold making to metal chasing, since he works on all the steps in between.

He thought it would be awkward for me to letter them directly onto the thin, delicate waxes.
And doing it twice would be no fun!

So he gave me a big chunk of wax with a smooth surface to letter on, which he would pull rubber from, and make waxes of the lettering to chop into the plaque.

That way, if anything went wrong it would be possible to assemble another wax with much less fuss and bother.

So I traced over the lettering with a ball point pen, which left a nice indentation on the wax.
And I used some white 'trace down' type paper to put in the horizontal lines.


Metal ended tool with a stalk and a ball shaped end


Rubber mold


 Lee finds household appliances handy for melting wax.
He's very careful not to pour molten wax on himself, as the hair on his arms reveals.


Trimming the edges of the lettering...

Lettering cut into place...


After the lettering  has been cut into the plaque Lee 'welded' it in place with hot wax.
Then I used a scrapey tool to carefully chase away the nasty looking weld, Lee cleaned it up with mineral spirits, I re-tooled the lettering to sharpen it up a bit and etched my name into the bottom edge and it's ready for a trip to the foundry for spruing, investing, burnout, casting and de-molding.

I'm making two: one for Mercy For Animals to present to Bob, and one for me, which will also serve as insurance against anything going wrong with the casting.

If one gets messed up somehow, there's a back-up.
Hopefully all will be well though!

Wax welding

Lettering in place before clean up

Lettering in place after clean up


Off to the foundry...!

I like the clean look around the lettering, so I decided to leave out additional cloud elements.
However I'm using the original art to make a new piece starring the same calf, but with a new background of clouds and rain, which I'll feature in an up-coming post...


.
Click these links to visit my website... SteveWorthingtonArt.com - Sculpture that loves you back
or my Etsy store, CritterVille
.

Wednesday, March 30, 2011

How to make a bas relief award plaque honoring Bob Barker...Part 1

finished plaque, added after this post was first published

I got an unexpected call the other day from Mercy For Animals.
They saw my mice up for silent auction at the Humane Society's Genesis Awards recently.
They wanted to know if I could make a calf in bronze they could award to Bob Barker on June 4th, so they'd need it shipped by May 25th.

Mmm.
Great opportunity, but not enough time to research, make, mold, pull waxes, invest, burn out, cast, clean up and create a patina on a calf in the round!

I wondered if they might fancy a plaque instead?
That would be do-able, with hopefully some wiggle room in case of any unexpected casting issues.

'Perfect', came the reply!

I think Bob Barker is a great name for someone who supports animal activism.
After all, plenty of creatures bob up and down, and then there's barking...

I wonder if he ever just lets loose and bobs about the house barking up a storm at the same time?
I would;
If that was my name.

Anyhow, a combination of lots of calf photo's from Mercy For Animals, and my own results from digging for more, along with some anatomical info got me familiar enough with the shapes and proportions to design my plaque.

I have always enjoyed the stylistic sensibilities of a lot of Art Noveau, Art Deco, and the Arts and Crafts movements.

I wanted to incorporate that hand crafted feel to the lettering as well as the relief, so I whipped out my pencils and got busy.

I did the lettering first so I could see what space I might have left over to work with for the image.

I scanned them and jiggled them about a bit in photoshop...

Next operation: transfer the image to my masonite board and start laying on some clay!
I used some white trace down paper (kind of a white version of carbon paper).


 Oh, those black blocks are magnets. I made my drawing board from thin foamcore over sheet metal so I can have it up at an angle and keep things in place.


After taking care of the furthest away elements I used wax paper over my drawing to make the background legs since they lay over the far background and I'd get it all chewed up if I tried to do it in place.


Getting it off the wax paper is a bit tricky since I prefer a fairly soft and quite sticky wax based clay!
Popping it in the freezer for a few minutes stiffens it up a bit, and pressing the clay into my fingers while folding the paper back on itself seems to do the trick...

Anyhow, as you can see, since I'm an artist living in Santa Fe I've enjoyed myself giving it a bit of a South West feel with the distant rain and what have you.

The clouds and terrain certainly make great design elements.

What a spooky looking calf!


You have be very careful when putting elements together that the whole doesn't get disjointed, all of unrelated thicknesses and what have you.
But I find keeping a careful cross reference back and forth throughout the process allows things to work out fine...


So far so good...


Ignore everything in focus!!


 My camera thought I wanted to take a pic of the floor (it's so very interesting, after all!).
The blurry strip in the foreground is an edge-on view after sticking my smaller masonite panel onto a slightly larger one, and kind of 'grout filling' between them with clay.
I took the pic to show how low the bas relief is.

By being careful how I define overlapping planes in the sculpture I've been able to achieve a good sense of three dimensional form, in barely more than two dimensions.


I suppose drawing for a living my whole life has helped out with that!


Next time...
LETTERING!

Incidentally, there's no spoilers here since I learned that Bob knows he's getting awarded and I have been given the all clear to post 'in progress' reports!


Click these links to visit my website... SteveWorthingtonArt.com - Sculpture that loves you back
or my Etsy store, CritterVille
,